DIY HALLOWEEN MUA: VOL.1 2014
- blonde2brunette

- Oct 8, 2014
- 4 min read

When it comes down to the nitty gritty of picking and choosing your make-up, pick the one that really inspires you and makes you want to go great lengths with it. Whether difficult or easy, it never hurts to give in a couple tries before your future halloween costume party.
I have the hardest time choosing one, and thanks to our viewers out there, I'm really excited to be able to make multiple looks just for you all (and luckily my friends and family are just as crazy about Halloween as I am, so there will be more than one party).
To start us off I thought of one my favorite quotes from a movie
"In the real world, Halloween is when kids dress up in costumes and beg for candy. In Girl World, Halloween is the one day a year when a girl can dress up like a total slut and no other girls can say anything else about it." - Mean Girls
I couldn't help myself, October 3rd, did just pass LOL(and for the record I could careless if you are fully clothed or naked on Halloween, just set yourself apart with some killer makeup).
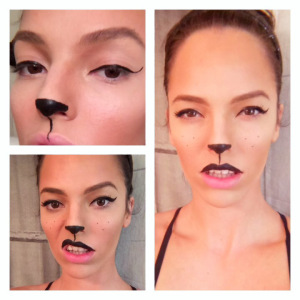
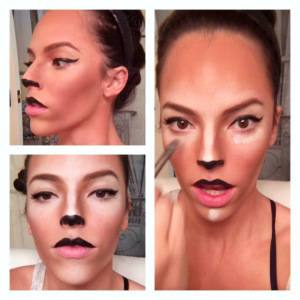
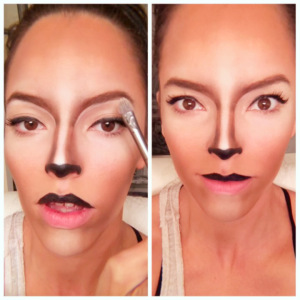
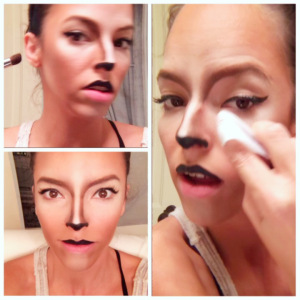
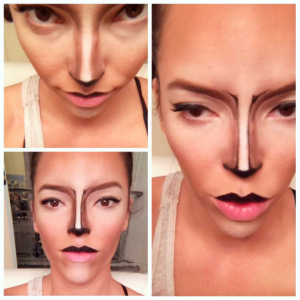
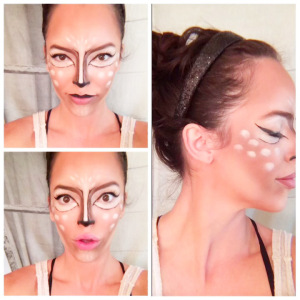
So back to Mean Girls, I thought of the cute animal ears Seyfried had worn and thought lets start of with the most classic and simple, BLACK CAT. Then with that same simple black cat makeup, we use and add another layer to create the cutest pins i've been seeing lately and that a DEER. Anyone else see those cute pins, with the antlers and the whole bit? The original maker is 'SHANNON O' BRIEN', check my inspiration board for these looks below. I put these looks the the test, and had a blast!
[embed]http://www.pinterest.com/caropozo/b2b-halloween-inspo/[/embed]


With the deer look, I took it up a level and played with wigs( go to bay first for great prices of expensive brands), and head pieces I made from Caro's Confections Apparel. It's incredible how many looks you do can change with hair and props. So just when you think you've finished with a look, explore all options!

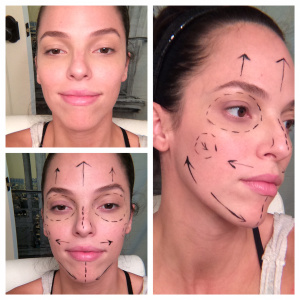
Then I wanted to create another funny/ creepy look you can do in a rush! I had seen a while back a picture of a barbie with pre outlined "surgical lines" for plastic surgery. Later i realized that this is an actually makeup people have pinned. You can take this as far as making your " Plastic Surgery Obsessed Woman" as hot creepy or scary creepy as you want. Scary in the sense you have a zombie based mua that you later add the surgical outlines, or hot creepy where you doll up her lines and lips as much as possible. I just focus on the lips.

I was able to create this look in 9 minutes flat ( I totally rushed, but thats the point). This is perfect for your office halloween costume party, or if you are SOOOO busy with work, that you have this as back up to do, for a last minute shindig!
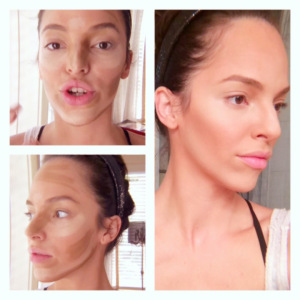
With these three looks, I started off with a basic base (The 'Plastic Surgery Woman', didn't have as much contour, just kept it simple with concealer and foundation).
PROCESS PHOTOS
For a complete list visit my first blog post, Caro's Favorite Everyday MUA HERE .
-Below is a quick over view in tools & tips for each look.-
'Plastic Surgery Woman' Tools & Tips:
-Basic makeup application (do whatever suits your routine).
-Liquid black liner: I used Benefit's 'Magic Ink Liquid Eyeliner', buy HERE.
-Red Lip Stain: I used Sephora's 'Cream Lip Stain in Always Red', buy HERE.
- Pink Cream Pigment: I used O.C.C. 's Lip Tar: Matte in Malibu Pink, buy HERE
-Lip Liner: Can be dark red or purple, I used Mac's Lip liner in Current, buy HERE
-Clear Gloss: use any kind!
- Lavender eyeshadow: I lightly used a lavender shade, from BH Cosmetics Matte Palette, buy HERE. (I highly recommend this palette if you want to save money and have a variety of pigmented colors for mua projects like these!!!!)
-Bandages: Whether cloth or gauze, get them at your local drug store! Any cloth braces, for back, knee ect. use that. The back one can be made into a tube top (regular plain tube top is just fine too).
Simple Cat MUA to Deer/Fawn/ Woodland MUA Tools & Tips.
-Basic foundation/concealer makeup, using the Everyday MUA materials from my early blog.
Added items below:
– Maybeline FIT Foundation Matte Sticks: I use these for added contour & highlight. Everyone will vary but the colors I used are, toffee caramel & ivory (btw these products are part of our special give away ending FRIDAY NIGHT). Pick up at any local drug store.
–Additional Layer of Highlight & Contour: BH Cosmetics Contour & Blush Palette. I bought mine at URBAN!!!! They carry a lot of BH Cosmetics.
–Clown White: I used Ben Nye’s white cream based makeup.
–Liquid black liner: I used Benefit’s ‘Magic Ink Liquid Eyeliner’.
Pink Cream Pigment: I used O.C.C. ‘s Lip Tar: Matte in Malibu Pink.
-Glitter: Use a pearl pink/purple tones.
–Brown/Taupe eyeshadow: I used a brown/taupe shades, from BH Cosmetics Matte Palette. (I highly recommend this palette if you want to save money and have a variety of pigmented colors for mua projects like these!!!!)
–BRUSHES- Blending brushes for shadows, small flat head brush for white circles, sponge for blending if you don’t like using brushes to blend. You can buy this at your local drug stores.
–SETTING POWDER– when setting your cream based products, do use a translucent powder. Any cream or nude colored powder may dull the paint. you can pat straight on lightly or use a soft blush brush to apply as well. You can buy these at CVS, specialty makeup supply stores like Sally’s or Ulta, Even brands like Maybelline and NYX have this product.
I hope you all enjoyed these, and hope it invokes the creativity in you! Let me know if you have any questions regarding these halloween mua looks. Next makeup post will have more of a gothic and haunting feel. So many looks to cover, so little time! If there is any look in particular you want, please email us or comment below!
Happy Hauntings,
Caro













Comentários